Introduction
I’ve known about home servers and NAS (Network-Attached Storage) for a while, but the $500+ price tag for even the cheapest NAS turned me off. The idea only became serious when I ran out of Google Photos and Drive space while uploading RAW images from my new camera. Sure, I could “cheat” with multiple accounts or sketchy apps (👀), but as a tech guy 🥸 I wanted a proper solution. A video from PewDiePie on “de-Googlizing” reminded me of the huge open-source ecosystem out there.
Digging deeper, I discovered I could host my own Google Photos and Google Drive alternatives using open-source projects—sometimes even for free, or very cheap if you want a custom domain. This post walks you through my journey: choosing hardware, buying a domain, and hosting my own file storage and photo gallery.
Google’s service alternative
Drive option
There are plenty of open-source cloud service for you to self-hosted your storage. Especially if you have a PC with large storage attached to it (let’s say 500Gb is more than enough for personal use). Filebrowser and nextcloud are the options I recommend. From my understanding, FileBrowser is fast and efficient way to expose your local storage, the file moving or copying speed is unnoticeable. In the other hand, Nextcloud provides a full ecosystem for you to replace google services, or even more, such as Nextcloud Talk (google meet), Nextcloud Office (google doc, sheet, slide), etc. But I’ve decided to go with Nextcloud since it natively supports WebDav which I could use as storage place for my other service/apps 🙌🙌🙌.
Photos gallery
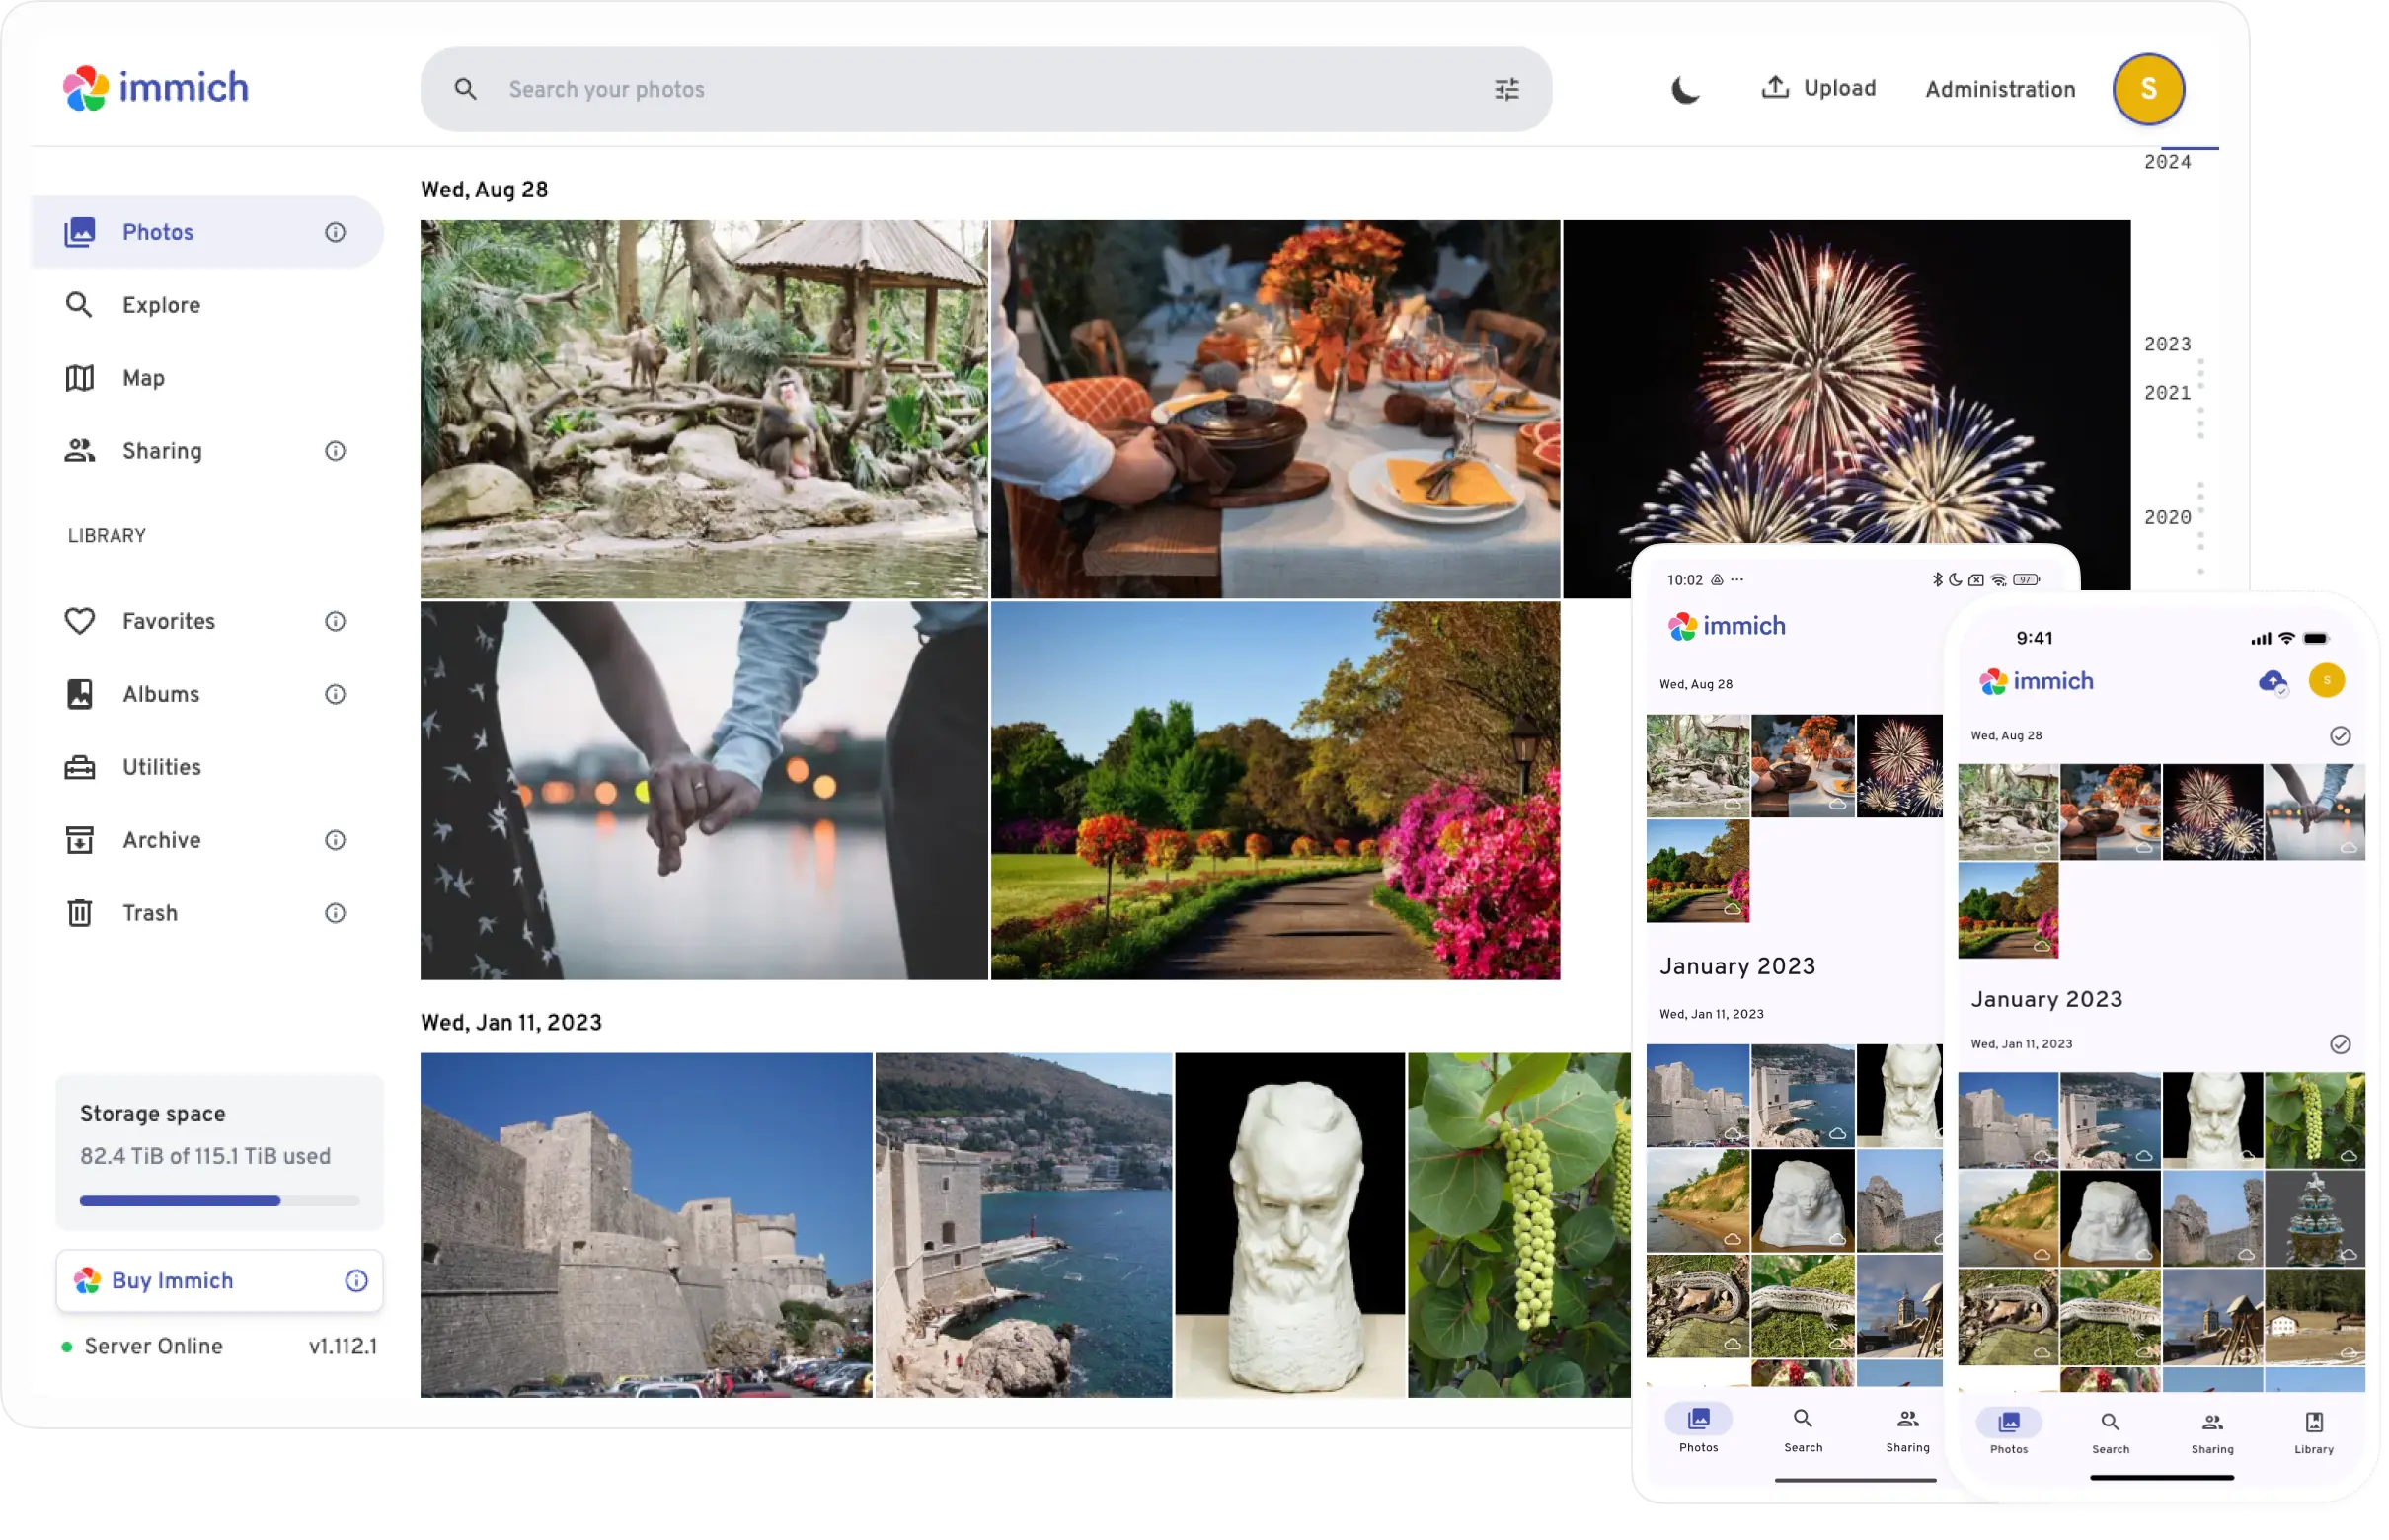
Finding Google photos/iCloud alternative service, Immich is the your destination. Immich is well-known in the community for a long time for their friendly UX/UI, many cool feature be developed and updated lately, especially Immich do have the machine learning feature for clustering face and do smart search on our gallery.
Although as a user, I must admit the face detection of Immich is not yet close to Google, however, realisticly speaking, I don’t use that feature much in daily basis. The only downside of Immich is the hardware requirements, Immich requires at least 2Gb of RAM (but 4Gb in recommend) and 2GHz of CPU for running those processing (creating image’s thumbnail, detecting face, etc).
Hardware choice
As I mentioned before, of course you don’t have to spend >100$ for some configured NAS. This solution cost time and effort only 😂.
Scrolling through online tutorial, reddit discussion, and so, I saw many people suggesting Raspberry Pi for their convenience, portable and little power consumption. But I don’t think so, with Immich, you need at least Pi 4 or 5 to smoothly run your service at acceptable rate, and in the future you have plan to serve more than just drive and photo service, (like adguard home, static website, etc) Pi might no suit you well. In my opinion after survey for sometime, Raspberry is quite expensive, there are ton of option our there, for example, your old laptop (0 cost) or tiny PC (about 20$ - 25$).
Personally, I’ve bought a Dell Wyse 3040 with less than 20$ here in Vietnam but 2Gb Ram and quad 1.44GHz CPU is quite weak to serve Immich (still powerful than most Pi 3 model). So I have upgrade to the thin client HP T820 with 2 3GHz cores and 4GB Ram. This thing is running like a monster (even though it only have 12V adapter. this might consume electric less than your lightbulk), I have hosted 4-5 service but still see no problem. (But those are still weaker than your very old 2010 laptop trust me 🤞.)
Install Immich and Nextcloud
I highly recommend using Docker for install and maintain these home service. If you installed Ubuntu server like me, these official command might help:
# Add Docker's official GPG key:
sudo apt-get update
sudo apt-get install ca-certificates curl
sudo install -m 0755 -d /etc/apt/keyrings
sudo curl -fsSL https://download.docker.com/linux/ubuntu/gpg -o /etc/apt/keyrings/docker.asc
sudo chmod a+r /etc/apt/keyrings/docker.asc

# Add the repository to Apt sources:
echo \
  "deb [arch=$(dpkg --print-architecture) signed-by=/etc/apt/keyrings/docker.asc] https://download.docker.com/linux/ubuntu \
  $(. /etc/os-release && echo "${UBUNTU_CODENAME:-$VERSION_CODENAME}") stable" | \
  sudo tee /etc/apt/sources.list.d/docker.list > /dev/null
sudo apt-get update

# Install the latest version
sudo apt-get install docker-ce docker-ce-cli containerd.io docker-buildx-plugin docker-compose-plugin
Immich installation
To install Immich, first we need to create .env file and config some value:
# Create immich directory
mkdir ./immich-app
cd ./immich-app

# Download latest config .env
wget -O .env https://github.com/immich-app/immich/releases/latest/download/example.env
Inside the .env, we only have to modify the DB_PASSWORD to our own password then we are good to go. Here is the docker-compose file:
#
# WARNING: To install Immich, follow our guide: https://immich.app/docs/install/docker-compose
#
# Make sure to use the docker-compose.yml of the current release:
#
# https://github.com/immich-app/immich/releases/latest/download/docker-compose.yml
#
# The compose file on main may not be compatible with the latest release.

name: immich

services:
  immich-server:
    container_name: immich_server
    image: ghcr.io/immich-app/immich-server:${IMMICH_VERSION:-release}
    # extends:
    #   file: hwaccel.transcoding.yml
    #   service: cpu # set to one of [nvenc, quicksync, rkmpp, vaapi, vaapi-wsl] for accelerated transcoding
    volumes:
      # Do not edit the next line. If you want to change the media storage location on your system, edit the value of UPLOAD_LOCATION in the .env file
      - ${UPLOAD_LOCATION}:/data
      - /etc/localtime:/etc/localtime:ro
    env_file:
      - .env
    ports:
      - '2283:2283'
    depends_on:
      - redis
      - database
    restart: always
    healthcheck:
      disable: false

  immich-machine-learning:
    container_name: immich_machine_learning
    # For hardware acceleration, add one of -[armnn, cuda, rocm, openvino, rknn] to the image tag.
    # Example tag: ${IMMICH_VERSION:-release}-cuda
    image: ghcr.io/immich-app/immich-machine-learning:${IMMICH_VERSION:-release}
    # extends: # uncomment this section for hardware acceleration - see https://immich.app/docs/features/ml-hardware-acceleration
    #   file: hwaccel.ml.yml
    #   service: cpu # set to one of [armnn, cuda, rocm, openvino, openvino-wsl, rknn] for accelerated inference - use the `-wsl` version for WSL2 where applicable
    volumes:
      - model-cache:/cache
    env_file:
      - .env
    restart: always
    healthcheck:
      disable: false

  redis:
    container_name: immich_redis
    image: docker.io/valkey/valkey:8-bookworm@sha256:facc1d2c3462975c34e10fccb167bfa92b0e0dbd992fc282c29a61c3243afb11
    healthcheck:
      test: redis-cli ping || exit 1
    restart: always

  database:
    container_name: immich_postgres
    image: ghcr.io/immich-app/postgres:14-vectorchord0.4.3-pgvectors0.2.0@sha256:32324a2f41df5de9efe1af166b7008c3f55646f8d0e00d9550c16c9822366b4a
    environment:
      POSTGRES_PASSWORD: ${DB_PASSWORD}
      POSTGRES_USER: ${DB_USERNAME}
      POSTGRES_DB: ${DB_DATABASE_NAME}
      POSTGRES_INITDB_ARGS: '--data-checksums'
      # Uncomment the DB_STORAGE_TYPE: 'HDD' var if your database isn't stored on SSDs
      # DB_STORAGE_TYPE: 'HDD'
    volumes:
      # Do not edit the next line. If you want to change the database storage location on your system, edit the value of DB_DATA_LOCATION in the .env file
      - ${DB_DATA_LOCATION}:/var/lib/postgresql/data
    shm_size: 128mb
    restart: always

volumes:
   model-cache:
If it starts successfully, you can find immich homepage at https://localhost:2283 (the default port is 2283).
Running Immich with remote ML
After monitor the homeserver for about a week, I notice a heavy workload, especially when start backing up the image from whatever photos cloud into Immich. One of the reason is caused by the machine learning feature running to clustering each face in the database, luckily, Immich provides a remote solution for us to host this heavy computing task to stronger machine and sync the result to our tiny server.
Easily, run this one on your PC (stronger machine) and comment the immich-machine-learning service on the homeserver. On the administration panel, you will find a “Machine learning settings” on the settings tab, config the URL to your path to your PC (e.g. http://192.168.1.xxx:3003).
name: immich

services:
    immich-machine-learning:
        container_name: immich_machine_learning
        # For hardware acceleration, add one of -[armnn, cuda, rocm, openvino, rknn] to the image tag.
        # Example tag: ${IMMICH_VERSION:-release}-cuda
        image: ghcr.io/immich-app/immich-machine-learning:${IMMICH_VERSION:-release}
        # extends: # uncomment this section for hardware acceleration - see https://immich.app/docs/features/ml-hardware-acceleration
        #   file: hwaccel.ml.yml
        #   service: cpu # set to one of [armnn, cuda, rocm, openvino, openvino-wsl, rknn] for accelerated inference - use the `-wsl` version for WSL2 where applicable
        volumes:
        - model-cache:/cache
        env_file:
        - .env
        restart: always
        healthcheck:
        disable: false

volumes:
   model-cache:
Nextcloud installation
Nextcloud also very easy to install via Docker, we only need to docker compose up this file:
services:
  nextcloud-aio-mastercontainer:
    image: ghcr.io/nextcloud-releases/all-in-one:latest
    init: true
    restart: always
    container_name: nextcloud-aio-mastercontainer # This line is not allowed to be changed.
    network_mode: bridge
    volumes:
      - nextcloud_aio_mastercontainer:/mnt/docker-aio-config # This line is not allowed to be changed.
      - /var/run/docker.sock:/var/run/docker.sock:ro
    ports:
      - 8080:8080
    environment:
      # AIO_COMMUNITY_CONTAINERS: "local-ai memories" # Community containers https://github.com/nextcloud/all-in-one/tree/main/community-containers
      APACHE_PORT: 11000 # Use this port in Nginx Proxy Manager
      # NC_TRUSTED_PROXIES: 172.18.0.3  # this is the NPM proxy ip address in the docker network !
      FULLTEXTSEARCH_JAVA_OPTIONS: "-Xms1024M -Xmx1024M"
      NEXTCLOUD_DATADIR: /mnt/media/nc-data # ⚠️ Warning: do not set or adjust this value after the initial Nextcloud installation is done!
      # NEXTCLOUD_MOUNT: /mnt/ # Allows the Nextcloud container to access the chosen directory on the host.
      NEXTCLOUD_UPLOAD_LIMIT: 1028G
      NEXTCLOUD_MAX_TIME: 7200
      NEXTCLOUD_MEMORY_LIMIT: 1028M
      NEXTCLOUD_ENABLE_DRI_DEVICE: true # Intel QuickSync
      SKIP_DOMAIN_VALIDATION: false # This should only be set to true if things are correctly configured.
      TALK_PORT: 3478 # This allows to adjust the port that the talk container is using which is exposed on the host. See https://github.com/nextcloud/all-in-one#how-to-adjust-the-talk-port

volumes:
  nextcloud_aio_mastercontainer:
    name: nextcloud_aio_mastercontainer # This line is not allowed to be changed.
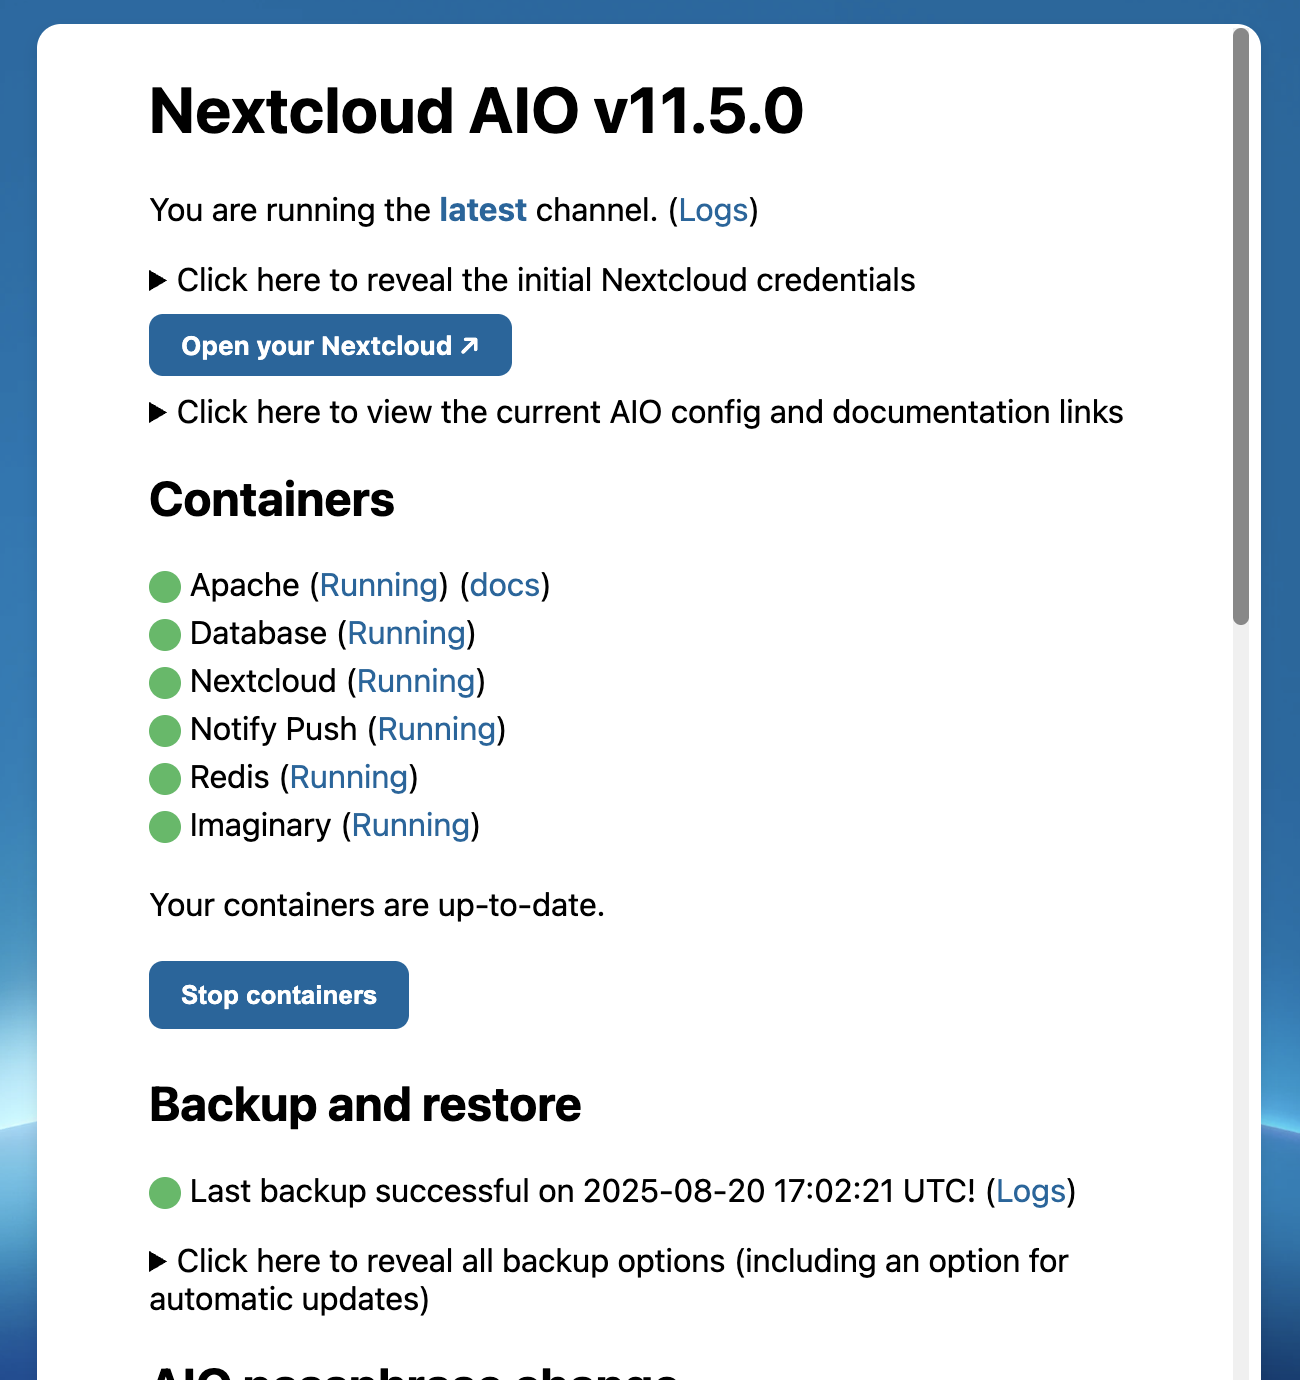
If the docker compose succesfully, you will able to access the NextCloud AIO Installer at port 8080 (https://localhost:8080). The instruction is very easy to follow and you can let Installer do their job to setup Nextcloud for you. One small note if you like me, only need NextCloud Files to replace Google Drive, then these containers are necessary, the rest are just other NC feature.
Setup reverse proxy
At this point, you might able to enter your new “Google” service at your local port. However, to enable us to using this application anywhere, we should have a domain name (and HTTPS cert 💀). If your IPS (Internet Service Provider) do give you a static IP, then you are no need to buy a domain, just remmeber the public IP. But if you like me, want to have a domain name for many use case, then enough talking, let’s go shopping.
Buy your first domain
You can survey for domain price in GoDaddy, NameCheap, etc. But in Vietnam, there are ton of provider with so much cheaper than that, in my case, I’ve bought my domain from iNet.vn with 1.2$/yearly and paid 5$ for 3 years (included other cost).
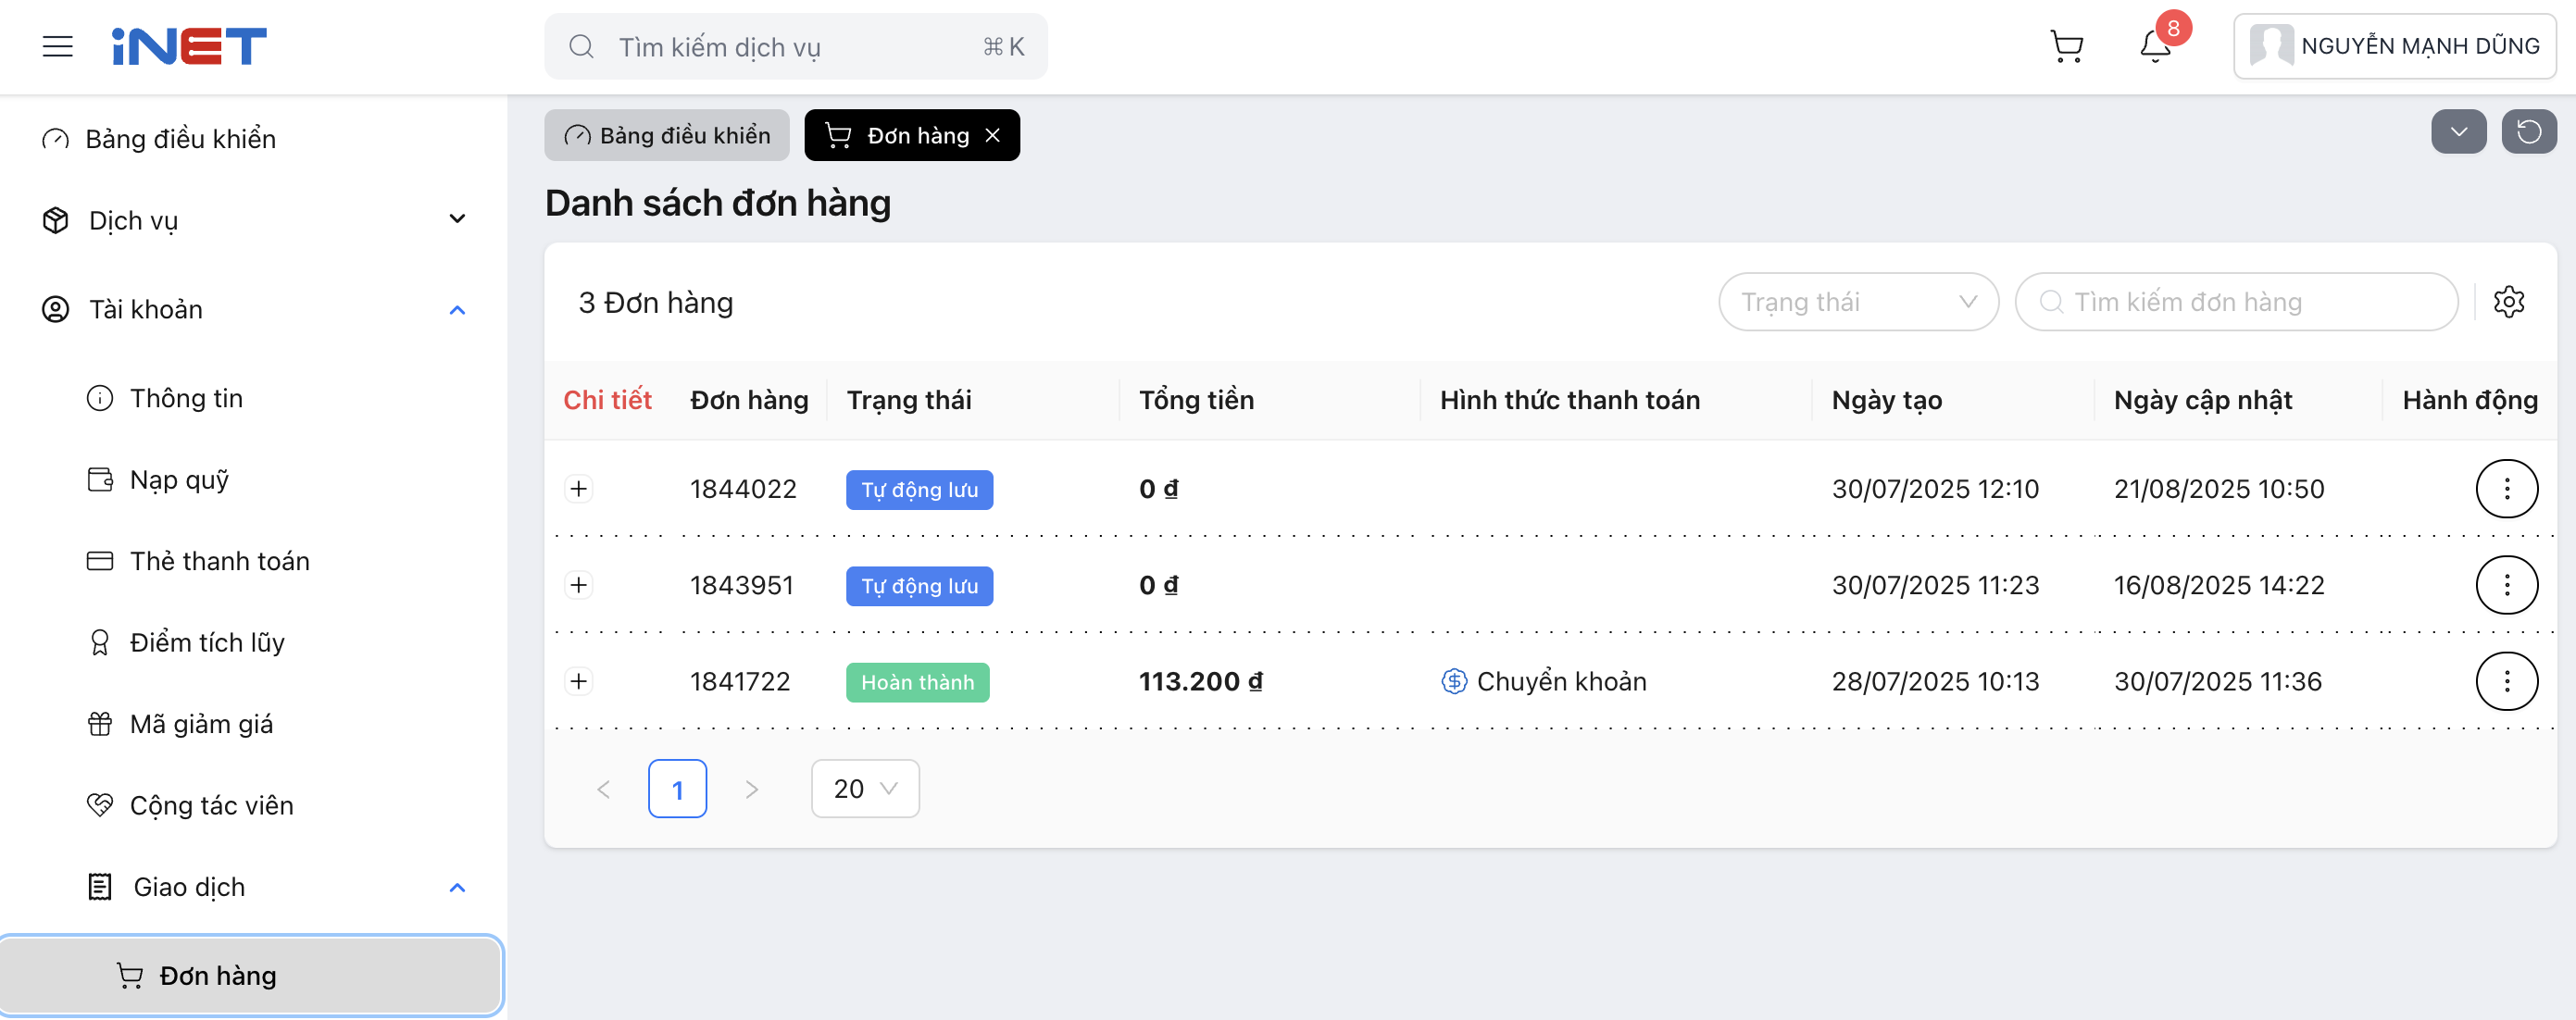
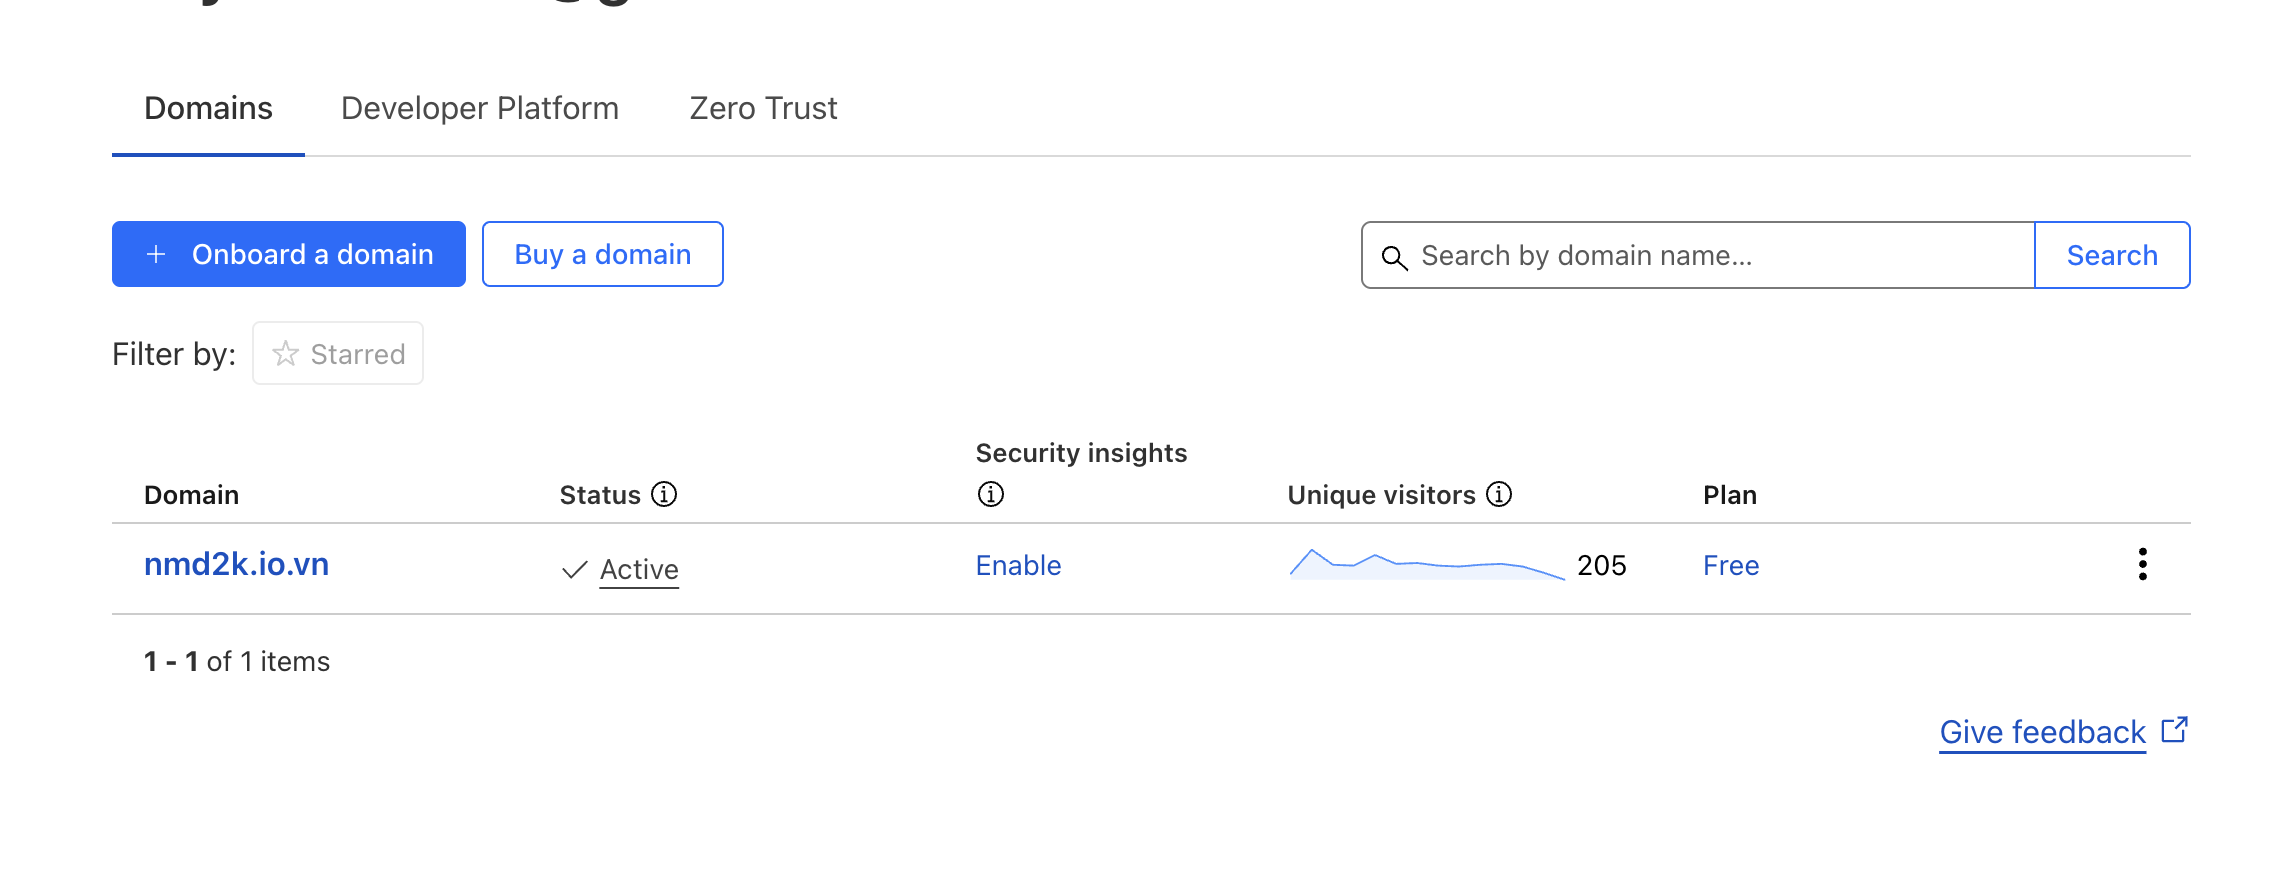
(133,200vnd ~ 5$ for total of 3 years) There is no different in provider domain, only the cost, so the cheapest thing is fine (you can have some free domain). After purchasing the domain, you need to create a new Cloudflare Account
For personal use, we need nothing more than a free plan:
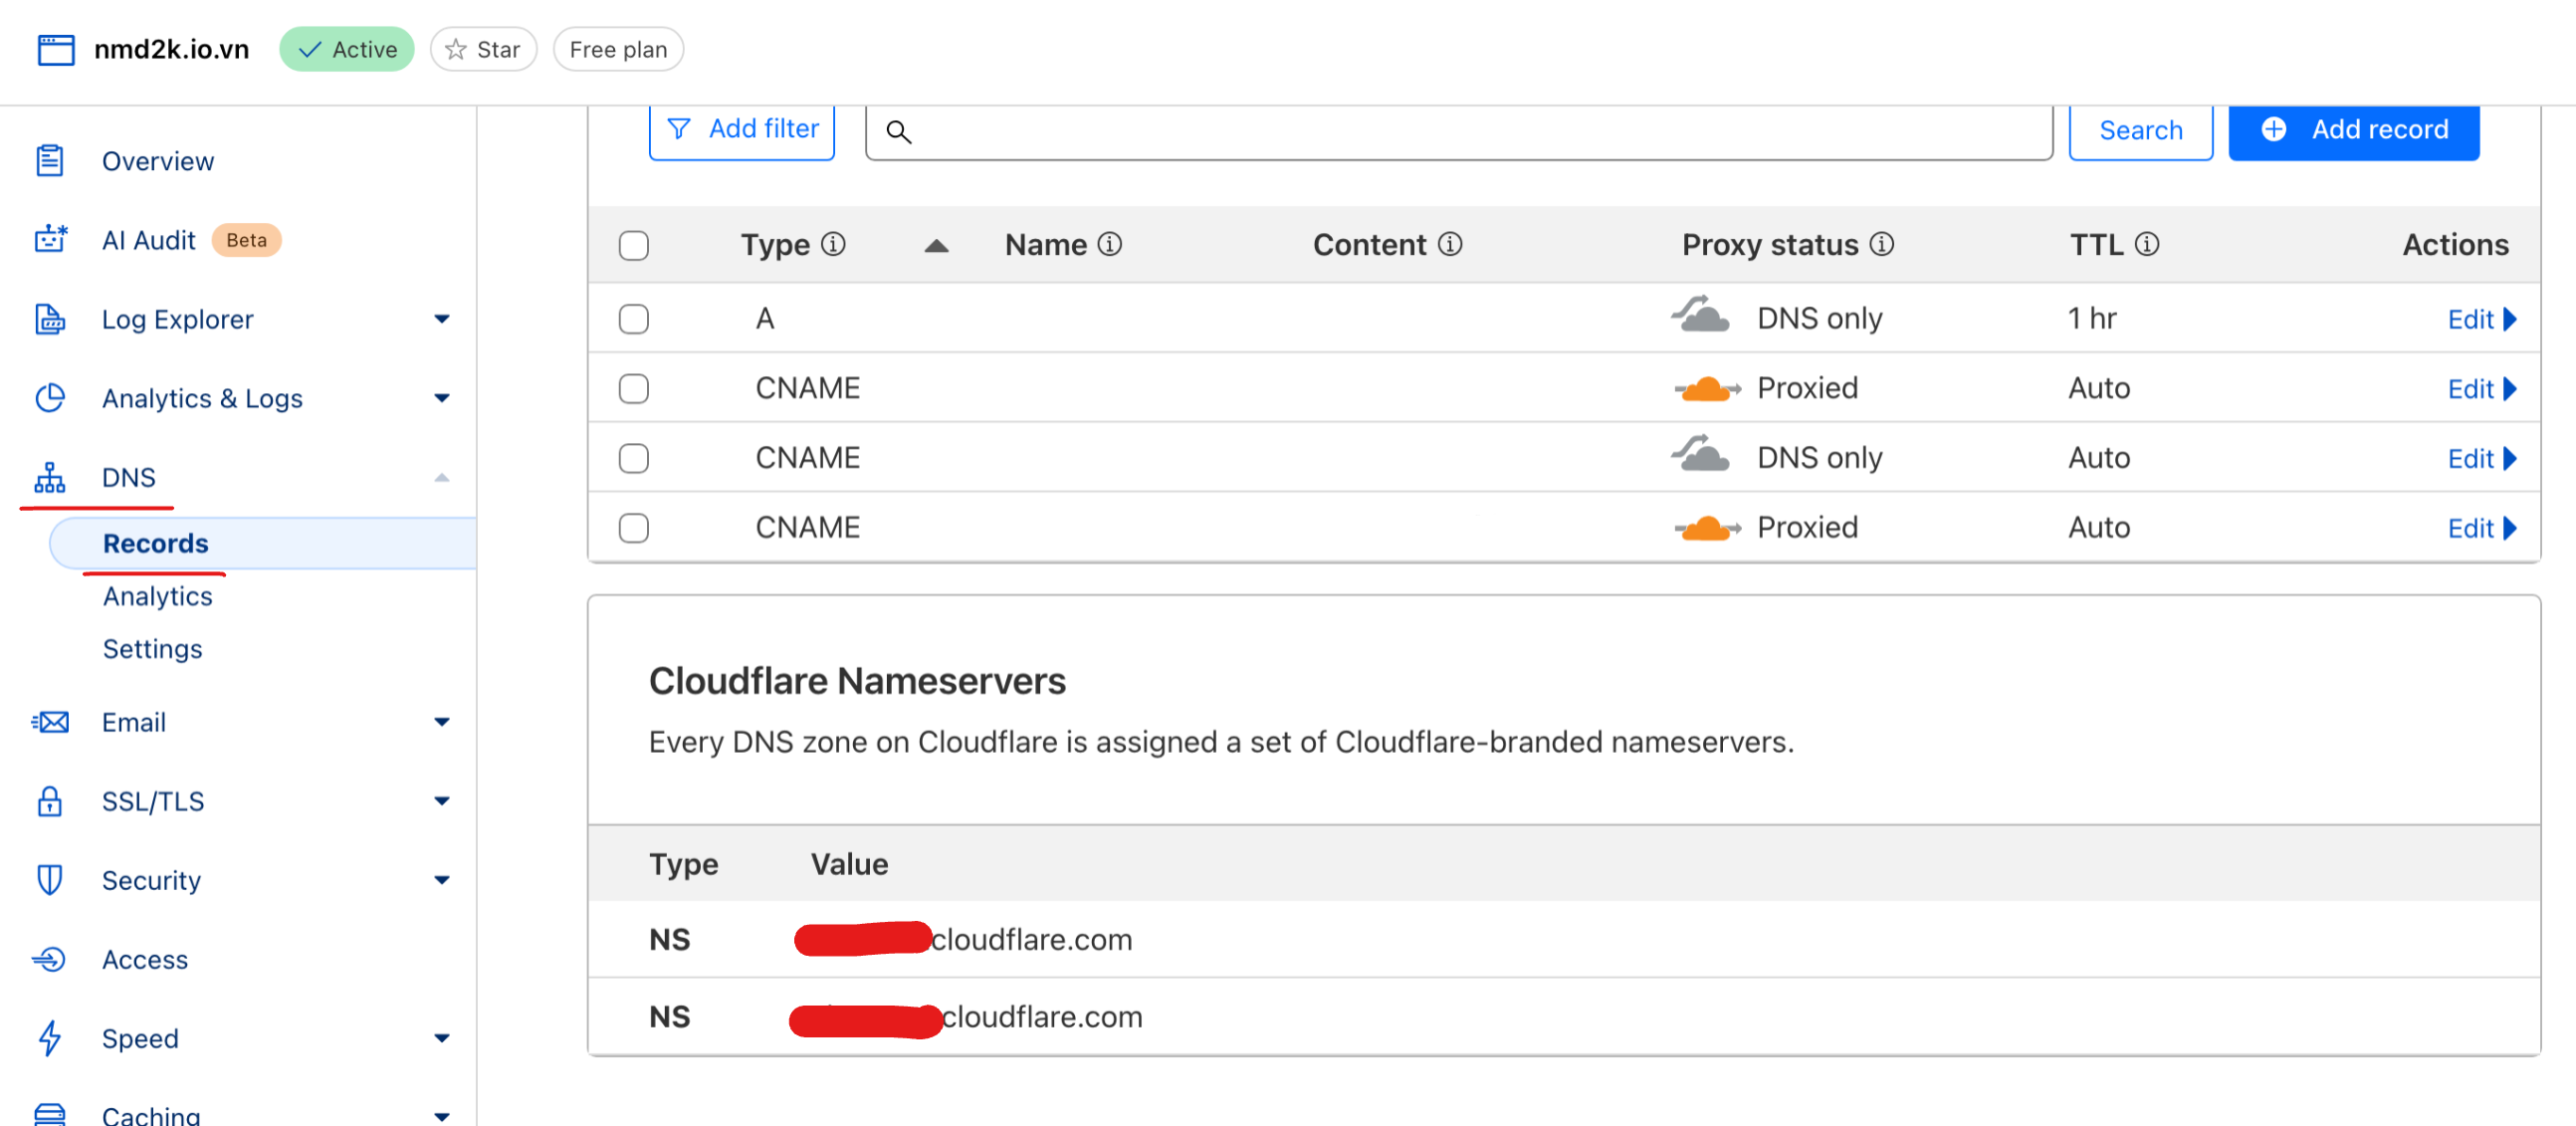
 Go to the DNS => Record, you should see at the “Cloudflare nameservers” something like “xxx.cloudflare.com”. These 2 values is important, you need to update your domain provider DNS Record with these 2 values, the process is different between each provider so I can cover it all here. By doing so, anyone who reach out to your domain, the cloudflare’s nameserver will forward it to our server (In next section).
Update Cloudflare’s DNS Record
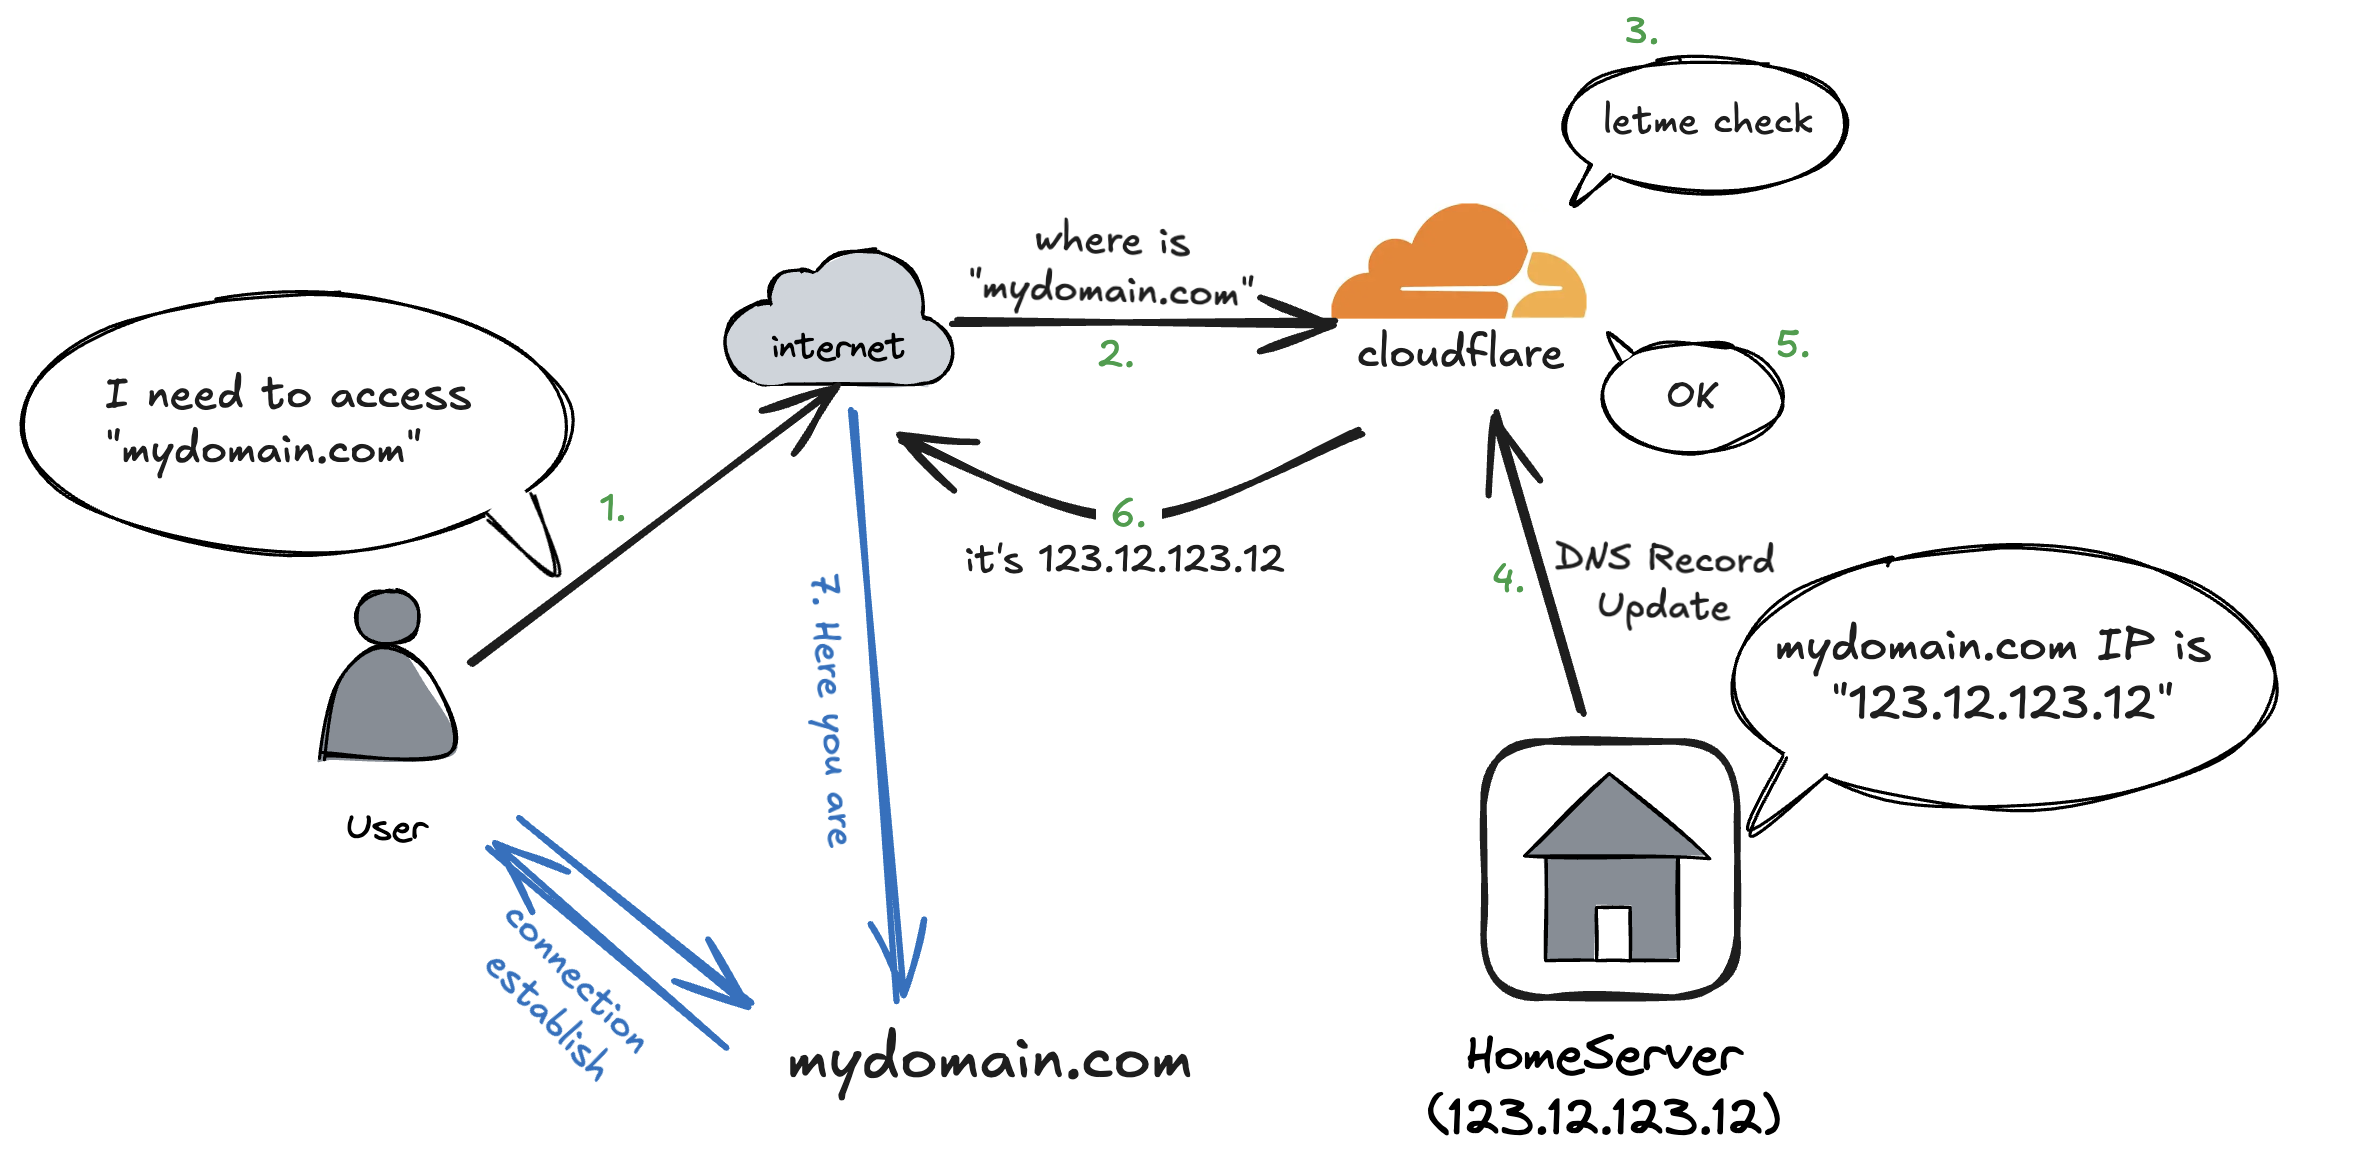
If you like me, you have a dynamic IP at where your server will host, then you have to config an auto-update script for keeping the Cloudflare aware of your public IP. Therefore, even if your router reboot (normally will change the public IP), then Cloudflare still knows what is your new public IP for route your domain to it.
 But easy for us, there are some folk has already done that. You can clone this repo K0p1-Git/cloudflare-ddns-updater and update the
 cloudflare-template.sh correspond to your account detail.
auth_email="" # The email used to login 'https://dash.cloudflare.com'
auth_method="global" # Set to "global" for Global API Key
auth_key="111aaa222bbb" # Your Global API Key
zone_identifier="123" # Can be found in the "Overview" tab of your domain
record_name="nmd2k.io.vn" # The record you want to be synced (mine is nmd2k.io.vn)
ttl=3600 # Set the DNS TTL (seconds)
Then we can add new record to our Cloudflare’s DNS Record.
- Type is CNAME, Name is * (for all), Content is our domain name
- Type is A, Name is our domain name, Content is our public IP (which will automated update)
- Both set to DNS Only (Grey cloud)
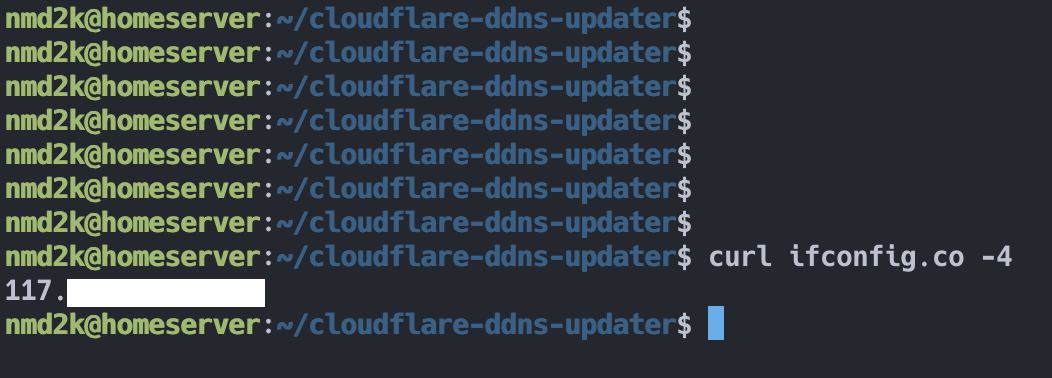
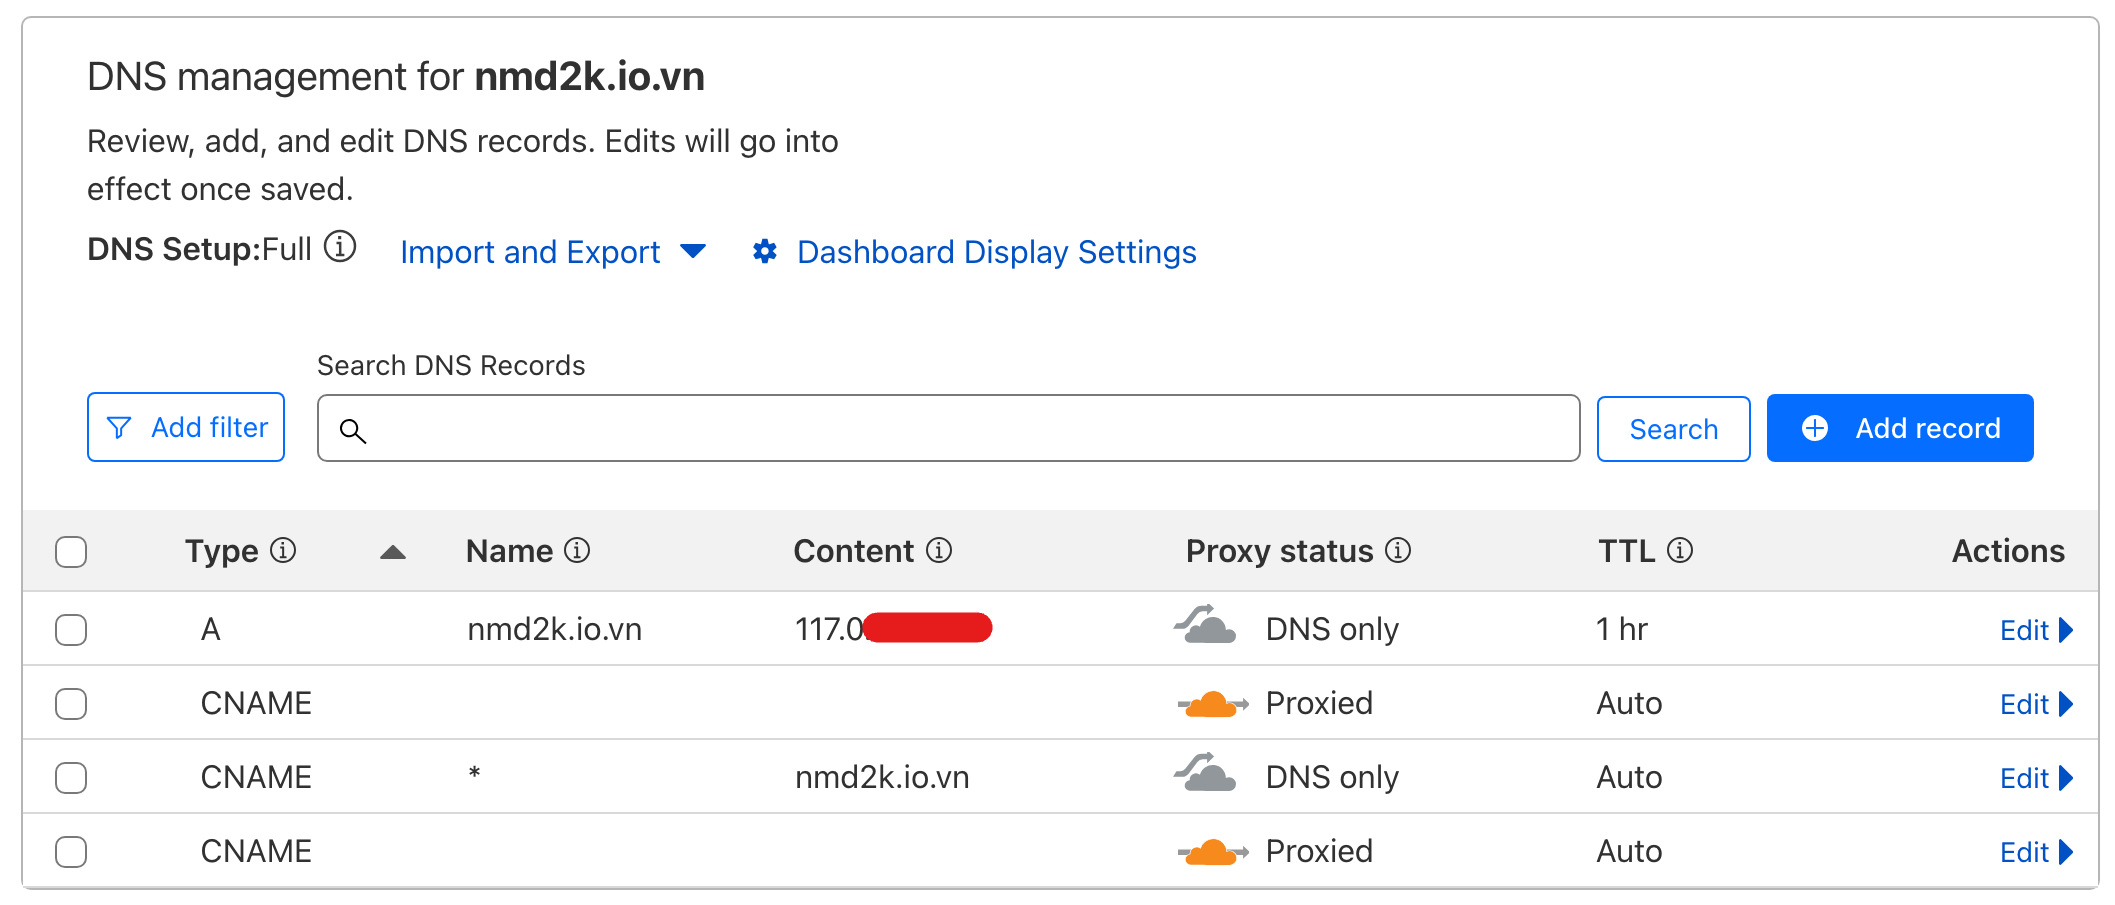 Now we have the Cloudflare point to our home server–the device we want to host our cloud service. You will see in my device (the thin client) have the same public IP with the one on Cloudflare DNS Record:
Config reverse proxy
If you are familiar with Nginx–a high performance framework for reverse proxy, I highly recommend you to use Nginx. On the other hand, reverse proxy can be defined as a middle man, who listen to internet requests and route them to correct service at the correct port. For example if I config my photos service at port 3003, then I want whenever I access to photos.mydomain.com the connection is establish between me and the port 3003. But there are very easy way to do this without any code at all. Let build our next service, “Proxy Nginx Manager”:
services:
# Remove the nginx-proxy-manager service if running elsewhere
  nginx-proxy-manager:
    image: 'docker.io/jc21/nginx-proxy-manager:latest'
    restart: unless-stopped
    container_name: nginx-proxy-manager
    #network_mode: host
    #environment: # Uncomment this if IPv6 is not enabled on your host
    #  - DISABLE_IPV6=true # Uncomment this if IPv6 is not enabled on your hostt
    ports:
      - '80:80'
      - '81:81'
      - '443:443'
    volumes:
      - ./npm/data:/data
      - ./npm/letsencrypt:/etc/letsencrypt
Then access to our port 81 (with http) http://localhost:81. From here, we can create our very first nginx rule to our proxy manager service:
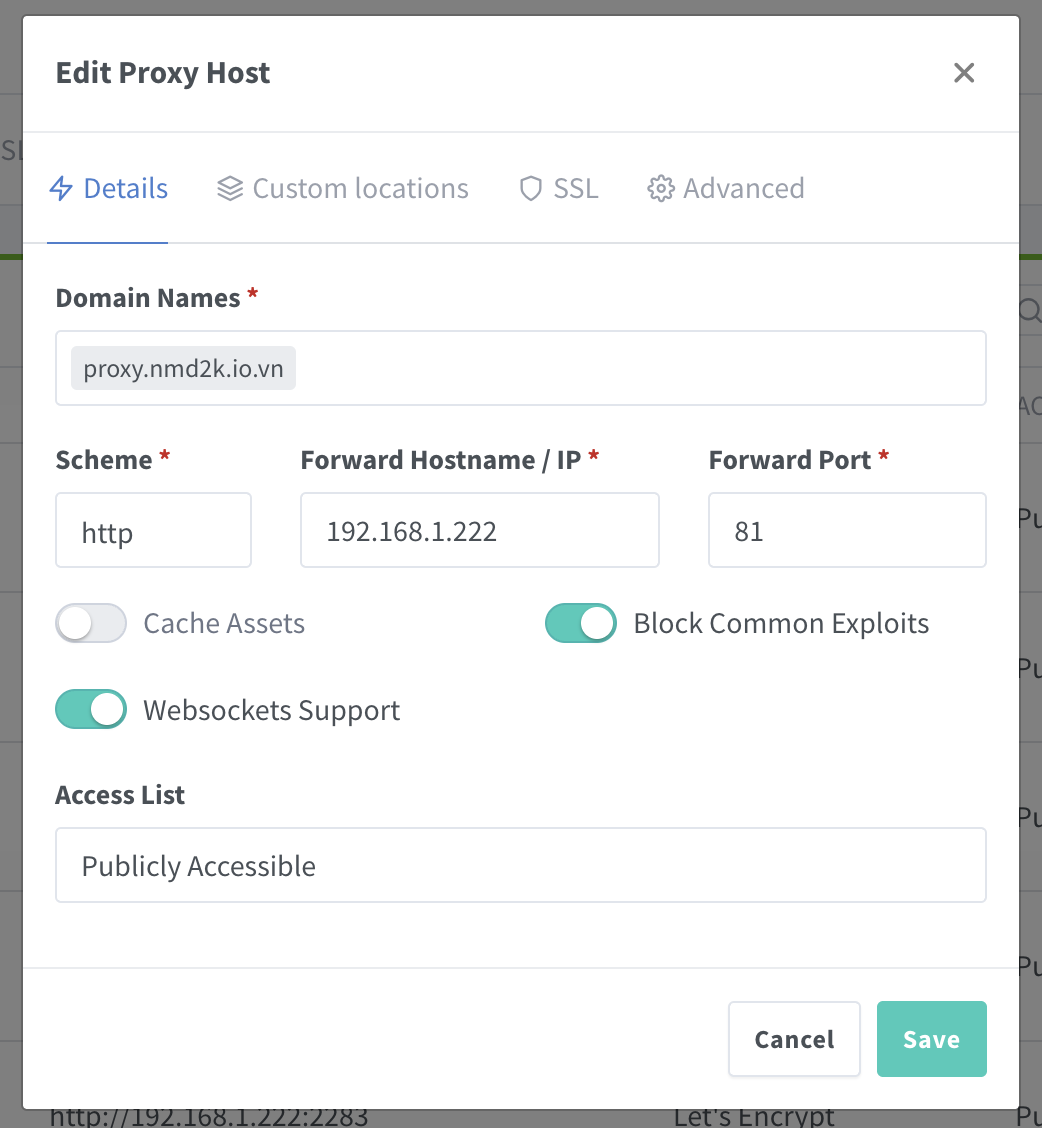
- Let’s say I will use
proxy.mydomain.comis the location for my proxy service - We tell the manager to listen at port 81 at our local machine (e.g. 192.168.1.222 here)
 One very great thing of Proxy Nginx Manager is that we can generate SSL certificate easily. With nginx we can generate with Certbot, but here we can simply go to the tab “SSL Certificates” and add a new one:
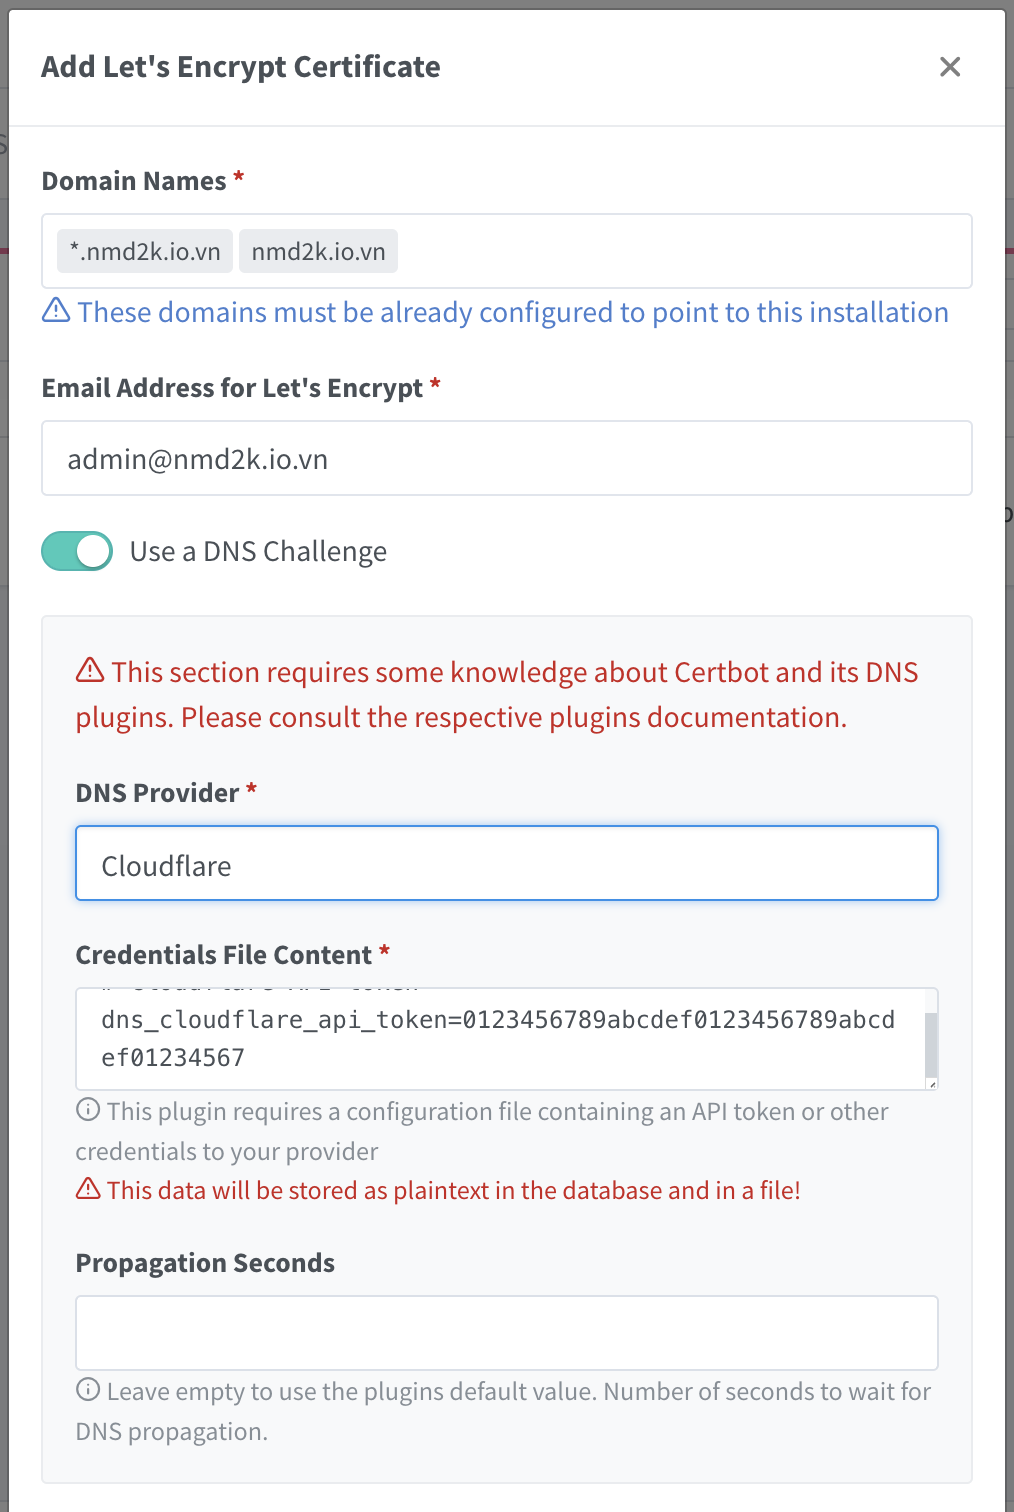 Here we should add our Cloudflare API token and add
 *.mydomain.comandmydomain.comto our domain name we want to generate SSL. This process could take a while but when it’s done we can add it to our Proxy Host (the step above) and from now on we can access our web service by HTTPS 🙌🙌🙌
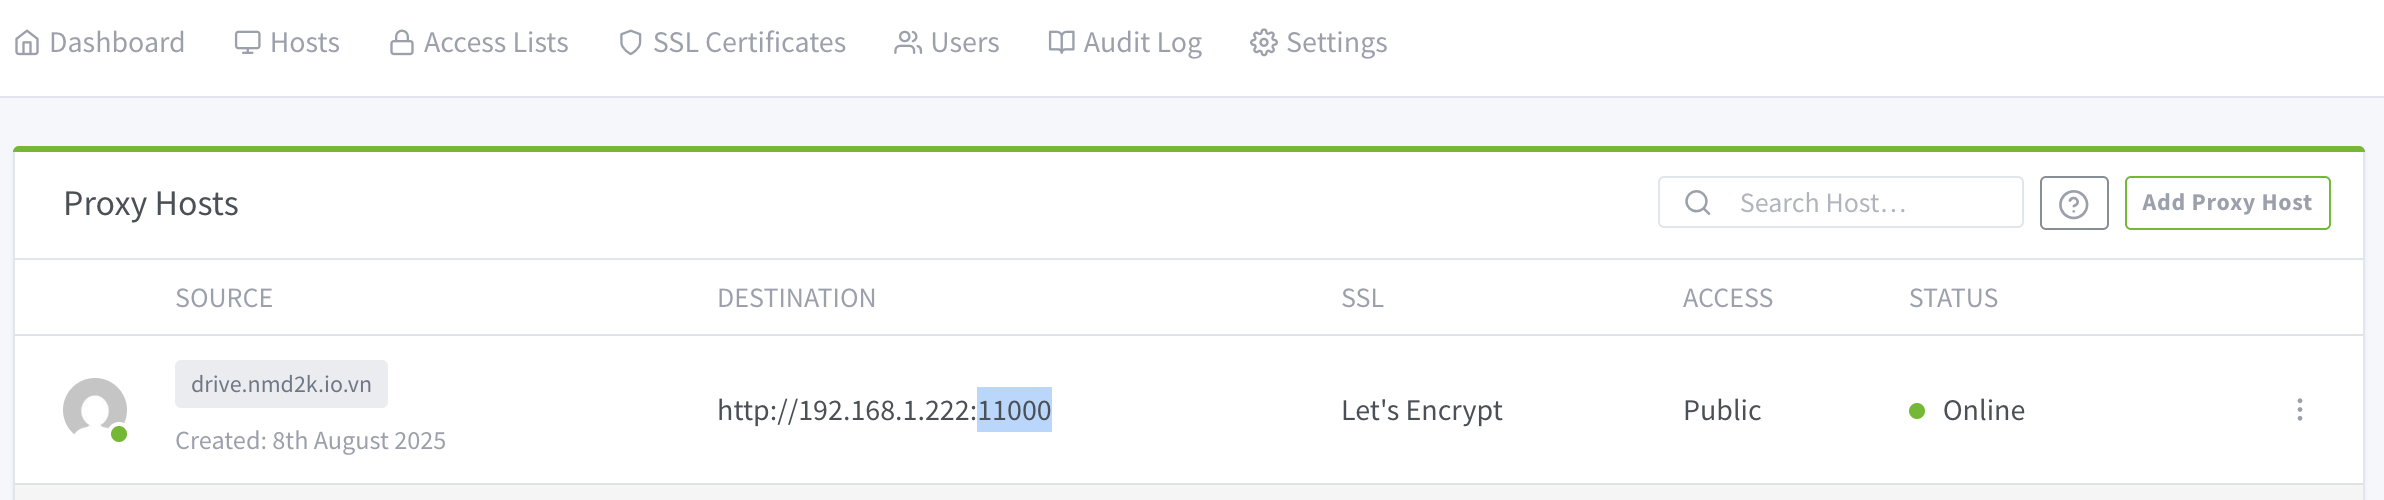
By now you have configured the first proxy host for proxy.mydomain.com the process continue with other proxy host you want. For example, for immich you can add photos.mydomain.com and listen to port 2283 (Immich default port) and for Nextcloud you can add drive.mydomain.com and list to port 11000 (Nextcloud default port).
🎉 Wrap Up
And that’s it—you now have your own self-hosted Google Photos & Drive alternatives with Immich + Nextcloud, running behind a secure reverse proxy, accessible anywhere via your domain.
These tools even have apps for Android, iOS, macOS, and Windows, so you can use them just like Google’s services—only this time, you’re in control.
Thanks for reading! 🙌 See you in the next post.